
Creating a photographic backscene
In summary:
> Create PVC (Vinyl) 'banners' costing £40-£80 per sheet (4' x 2') using photographs manipulated on a personal computer
> Make backing boards from plywood, and sealed with a coat of primer or similar
> Fix the PVC (Vinyls) using Vinyl floor spray (can be lifted and refixed) or paste (permanent)
The blow-by-blow backscene saga...
In the beginning...as a Hornby Dublo boy of the late 50s and 60s the Hornby Railway Company sent members a handbook which showed various 'layouts' on a grey baseboard, such that the train set could be viewed from all four sides.
But the scenic model railway was also making its first showings, with layouts like the Madder Valley (now preserved at The Pendon Museum) leading the way.
The Madder Valley was 'framed' and demonstrated the effectiveness of presenting the layout for a potential 'viewership'. It demonstrated that if trying to create a model landscape (as opposed to an area to demonstrate model trains) then any backscene was better than no backscene.
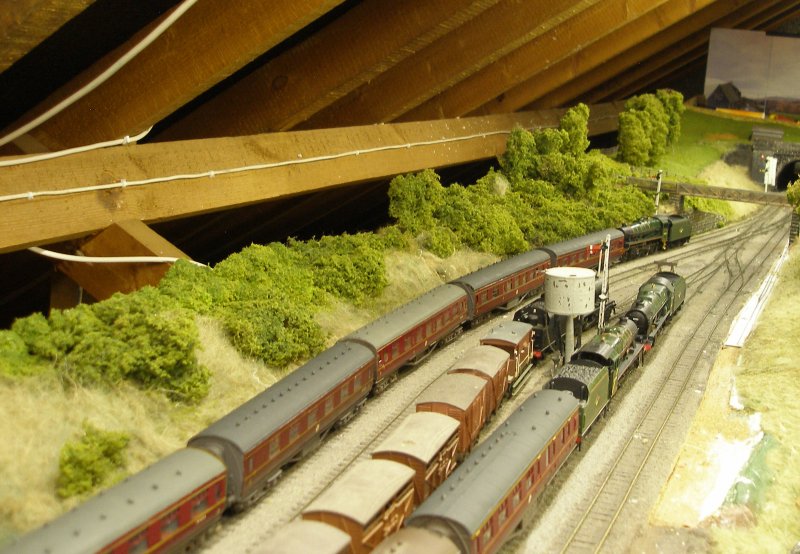
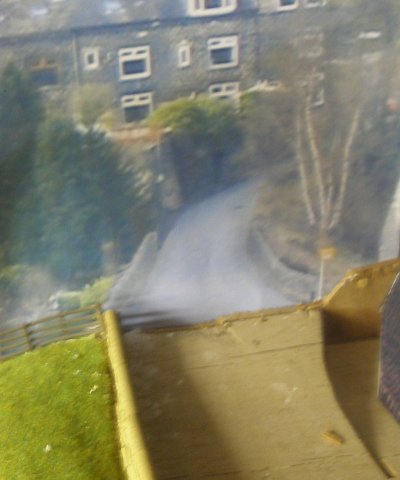
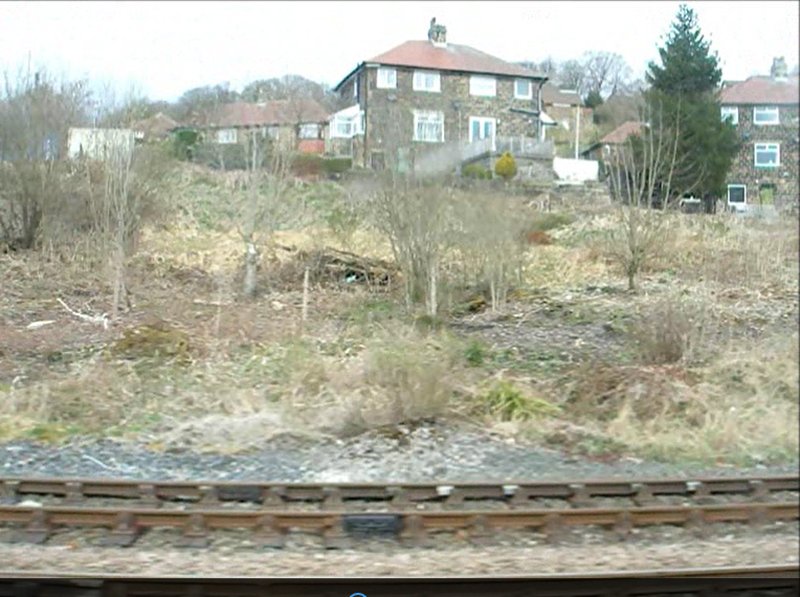
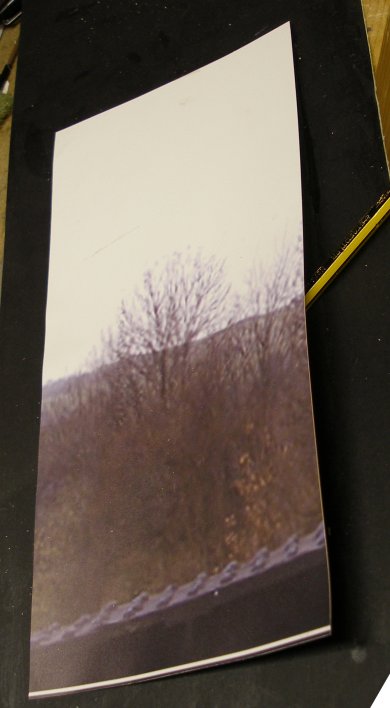
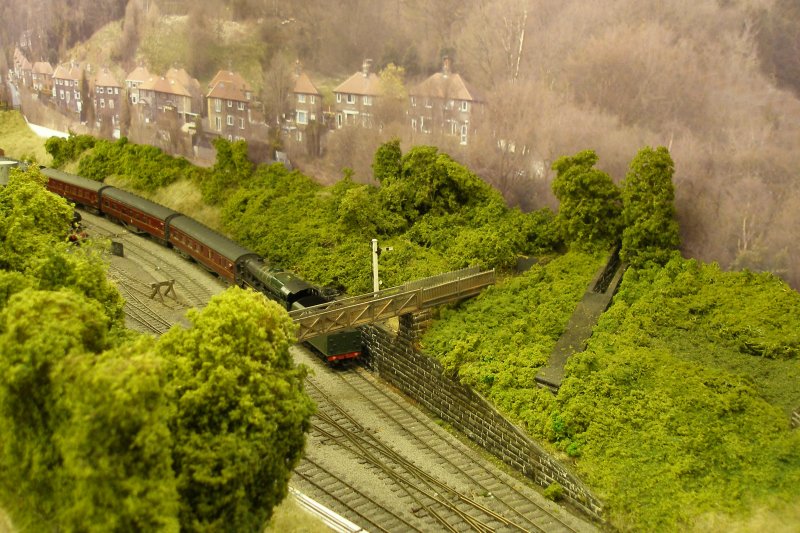
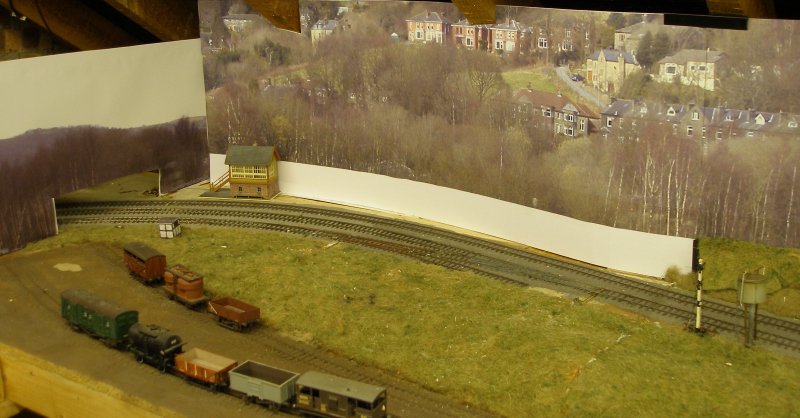
The image below show the problem. Whilst the strip of real estate is nicely enough portrayed, the eye ultimately wanders to the black void interspersed with roof timbers behind the hedgerow.
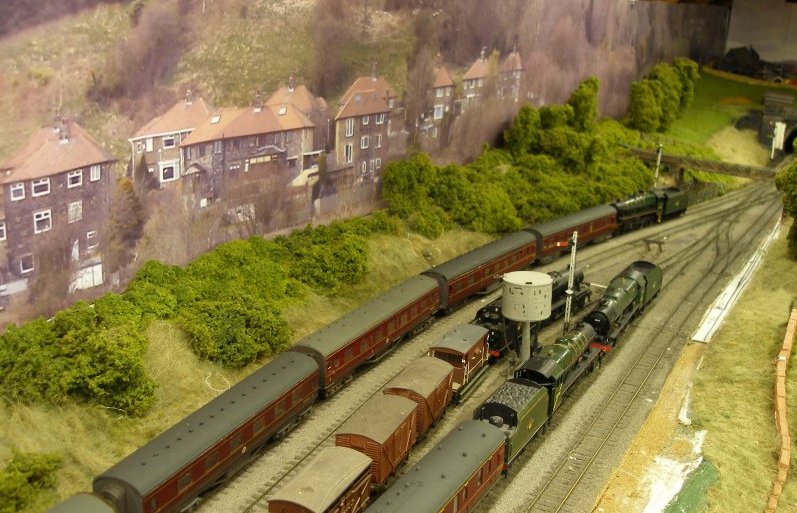
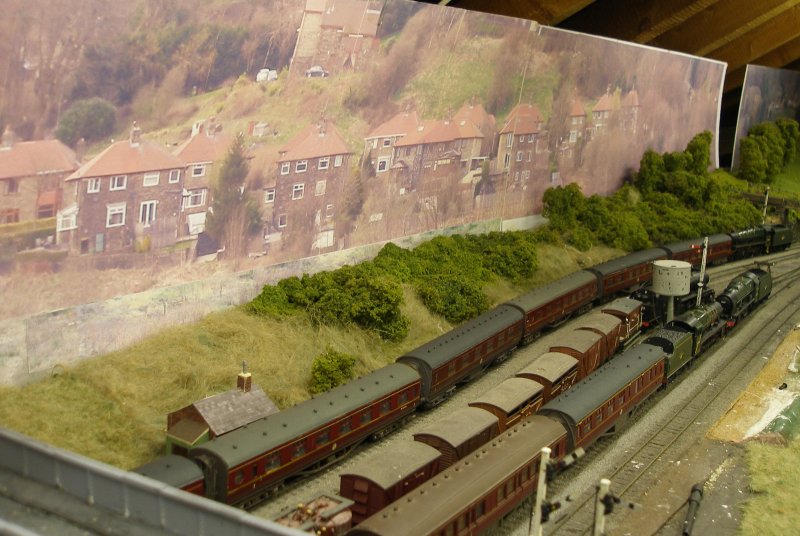
Whilst the railway elements are accurately portrayed, there is little to suggest a place. This is how the same scene appears with a customised photographic backscene added.
Options
There are three ways of providing a backscene:
1. buy a ready printed scene
2. create a scene from a photograph and print it out as A4 sheets from a home printer
3. use a photograph but have it professionally printed on a large sheet
There are now some excellent photographic panoramas produced both by European manufacturers and also by a small number of UK providers. The downside is that you will see these on other people's layouts, and they will be of generic views, so make not be specific to the part of the country that your layout is set in.
Some wonderful UK panoramas were produced by Jenny Drake 2003 - 2006, including, ironically, one shot in Todmorden. A section of this would have done nicely for my current effort, and, following advise from Jenny, have subsequently found the location she originally used!
Jenny printed her backscenes on either matt paper or Opaljet, which was described as a thin, but tough and very dimensionally stable plastic film. The background was printed on the film and the ink then protected by laminating a matte, transparent, non reflective film over the top. It was claimed that this gave a long lasting background that was resistant to accidental damage. Cost was an issue as a 2.5 metre by 0.5 metre scene on Opaljet was priced at £118. This compares to a water-resistant matt finish inkjetted onto PVC for about a third of the price in 2016.
Although the Peco painted scenes remain popular, they are showing their age. An OO sheet is typically 737mm x 228mm (29in x 9in) and costs only £1.55.
My personal favourites were the series of painted scenes produced by Townscene, which I used extensively on my previous freelance layout. I also successfully converted the Townscene 'hotel' into a low relief model. Sheets cost £3 per sheet.
However, the arrival of the digital camera and home computer have opened new horizons, and has allowed modellers to create backscenes tailored to their particular needs.
Home made backscenes can be printed out as individual A4 sheets and pasted to a suitable board, or can be printed out on larger sheets professionally. The downside of this latter approach used to be cost, but now an 8 foot x 1 foot sheet can be printed on PVC for around £20, with the advantage that there are no obvious joins in the sky.
This article deals with shooting and using your own photographs, and the pre-print production processes, as well as the mechanics of using both home printed and professionally produced sheets.
The essential tools are:
0. A suitable scene to shoot
1. a digital camera with a panorama facility
2. a tripod to mount the camera on
3. software capable of stitching the individual shots making up the panorama together
4. photo-shopping software
5. a colour printer capable of achieving good definition
Whilst a panorama tool in the camera and suitable stitching tool are useful, they are not mandatory. With one of my recent scenes I have manually stitched the photos together, and for that, I could easily have used a series of photos taken sequentially rather than using the camera's own tool. The reason I did this is that the panorama tool reduces the resolution of the images, and if you have a scene which is at the extreme end of your camera's capabilities, you may need to preserve all the pixels you have. This was the case with my primary Hall Royd scene, which required a small section from an otherwise large panorama.
The photoshopping software is probably mandatory. Otherwise you have to shoot exactly what you want and get the size, colour and orientation right in one hit. Photo-shopping also allows inappropriate features to be removed. In the case of Hall Royd, the layout has a timeline of 1966 but the photographs were taken in 2013, and consequently a number of modern houses had appeared above the original 1930s street immediately behind the railway. Interestingly, there are two roadways that exit from the layout into the backscene, and these 'interfaces' have had to be manipulated in the image to match the hard scenery. The Hall Royd images were taken 'on the level', but the railway in the Calder Valley falls from left to right. Over the run of the layout (on which the track is level), this is sufficient for the road exiting at the left hand of a 12 foot backscene to match exactly, but the one at the extreme right was too high. This therefore required a subtle rotation of the image (by 0.4 of a degree) so that both roads matched, and the image trimmed 'square' accordingly.
Printing on A4 sheets with a modern colour inkjet printer will produce good results. I did buy a HP laser printer, but felt the results were not good enough for our purposes, and sold it on. However, if using a paste to mount the sheets on a board, they will need to sprayed with varnish (not brushed) to protect them, as the ink will otherwise run. Or one of the Spraymount aerosol products can be used. You can also visit your local print shop to see what they can offer, as the industrial laser printers are vastly superior to the home/small office machines.
This project has been 3 years in the making, and these notes are both offered as a guide for those seeking a similar solution, but also as a record for the author, as it is surprising what techniques are mastered, and then because of the prolonged gestation period, then have to be re-learned a year or more later! Plus things that worked in Windows 7 don't necessarily work - or are available - in Windows 10.
Picking the scene
The good news for anyone modelling the Calder Valley is that both the main valley and the Cliviger Gorge (up to Copy Pit) offer plenty of locations from which a backscene can be shot. If modelling a prototype, start with Google Earth. This uses satellite photography, and the ability to zoom in allows suitable locations on the opposite hillside to be identified. Having identified possible locations, these can then be checked out using Google Streetview - all from the comfort of your own sitting room.
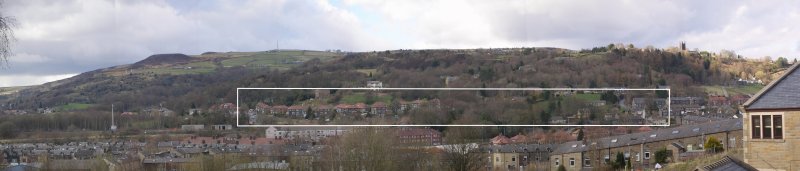
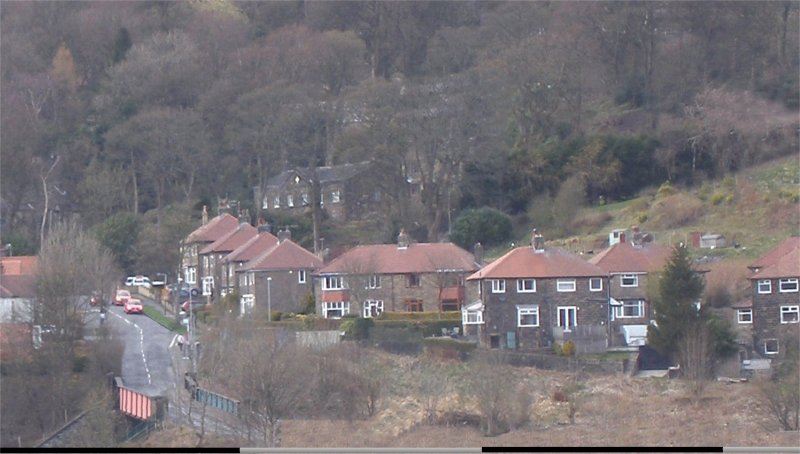
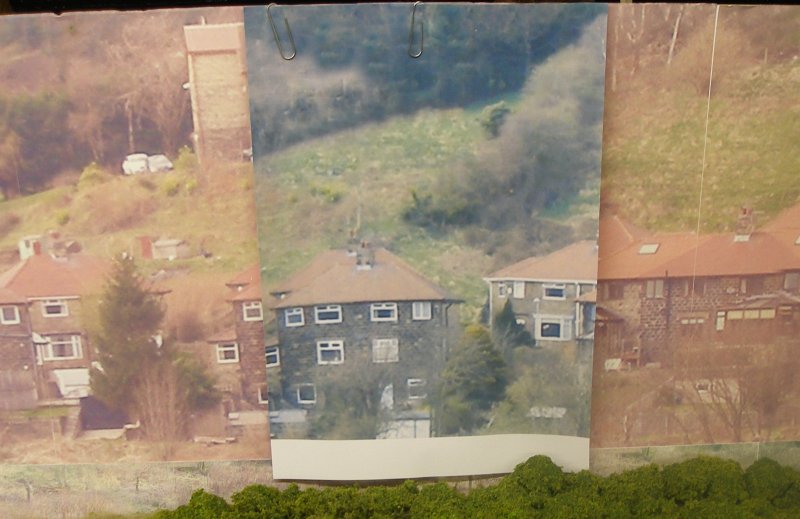
There are three locations which, when used together, allow an almost continuous backscene. However only two were required to achieve the 20 foot of continuous backscene needed for the layout. The images below shows the full extent of the panoramas taken from three locations on the southern side of the valley looking across at the northern side.
From Bagder's Wood housing development footbridge (right hand section on the layout):
From Longwood Road (left hand section):

And the one that wasn't needed, from Kilnhurst Avenue, showing the section that takes the Panorama eastwards:

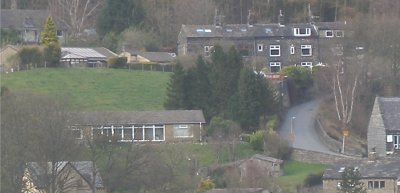
To complete the series, a Panorama was shot looking westwards from Hall Royd Bridge to provide an 'end scape' for the end of the layout, thus:

The full Badger's Wood panorama was formed from 9 frames, with the camera mounted vertically. However only four frames were actually used, and although the above image was created using the Olympus panorama tool, in reality only four frames were required, and for the final cut a higher resolution was obtained by manually stitching the frames together.
What about the sky?
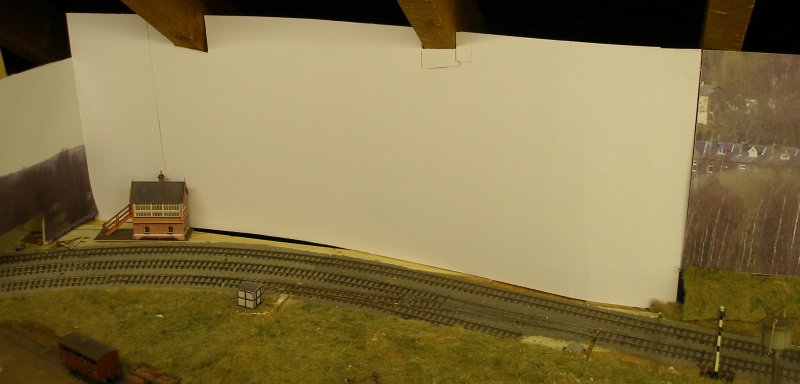
Anyone who has seen the 'Black Country Blues' layout will have been impressed with the way the layout is framed by its backscene. The backscene features a distant view of a typical West Midlands hills scene with skyscape. This, to me, is the way it should be done in an ideal world. Follow the link above to see a video of the layout and its setting. With my own layout there were two problems. Firstly the layout is under the eaves of a loft, so there is only a foot between the scenery and the roof timbers. Secondly, this is a prototypical location, with a signature street scene behind the layout, and two locations where roads exit into the backscene.
Trees...
Up till 1968 British Railways diligently cleared its embankments and cuttings of trees. But once the threat of those nasty, fire-throwing steam trains had been dispatched to the scrap yard, the need to keep the lineside clear was thought to be greatly reduced and trees were allowed to grow. Worse, land usage has changed and the planet has gently warmed up. The end result that there has been greatly enhanced tree growth in the last 50 years or so. This has two effects. Classic 1960s railscenes are now lost, and even if you are a modern-era modeller, it is often difficult to see the railway for the trees.
Other sources
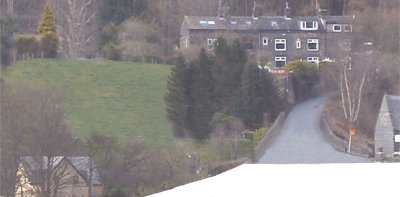
Mention has already been made of Google Streetview. Google uses a van with the cameras mounted on a pole, so placing it about 8 or 9 feet above the road. As a starting point to test the technique, I have used some of this imagery to create an end piece for the layout. The Spraymount is starting to lift, and the sheets will have to be re-affixed. Note the building, also created from Google imagery!
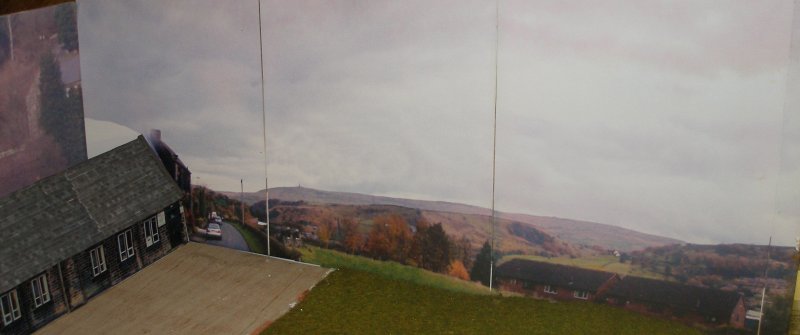
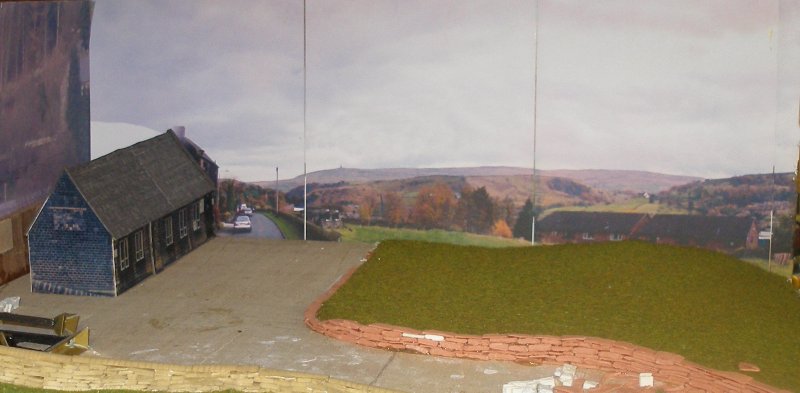
Image enhancement
Given the distance I am shooting from (approximately half a mile) and the (these days) relative low spec of the camera, I am working at the extreme end of the camera's range. Despite this, I am genuinely impressed with the detail that has been captured.
To make fullest use of every pixel the panorama was created manually, rather than using the stitching tool. This ensured that the resulting image was not compromised in any way.
Secondly, the image was significantly enlarged, as this help smooth otherwise awkwardly formed shapes e.g. window frames. I used a factor of four or thereabouts, such that there were four pixels to the millimetre. This allowed measurements from the layout to be easily converted when reworking elements on the image.
Selecting the underlying colour hue is discussed elsewhere. However, the image was also lightened by approximately 40 percent, as images tend to print out darker than they appear on the screen. In PaintShop Pro a 'contrast' tool is provided in the same function, and the contrast was heightened by about 20%.
The use of an Unsharp/Sharpening tool should be checked out. This tool recognises that what looks good on the screen won't necessarily translate to the final printed output. There are formulas for this, but it really is 'trial and error'. I took an A4 section and then tried out a variety of settings. It may seem that you are using a lot of ink, but given that the backscene will be an in,tegral and very visible part of your layout, it is worth it. The thing to note is that with the Sharpening applied, the image on the monitor will look 'rough', but when it is translated to the printer, it provides clearer defined edges to objects.
Printing out
If you are going the A4 route, you need a method for easily slicing up the image. I created a duo-coloured measuring bar which was applied to the bottom of the image, each segment being the equivalent of an A4 sheet. The 'pages' are copied sequentially out of the main image and dropped into PaintShop Pro as a new image. You may need to adjust your settings to ensure that the image is centred for printing (otherwise you'll print out a corner with a lot of white space around it. Use the 'Print Preview' and then 'Print Set-up' tools to get the image set-up for A4. An A4 sheet (when trimmed) works out at 220 millimitres, and therefore as the image is 4 pixels to the millimetre, the bar has to be 880 pixels long. So an image 880 x 20 px is created, and coloured black. This is then doubled using Image > Canvas size, and the new section coloured differently. The resulting image is then pasted along the bottom of the main file, as shown below. The height is 280 mm, and the main image has been accordingly sized. For the record, a 12 foot long backdrop requires 18 and a third A4 sheets!
Photoshopping
The use of the Photoshopping tool is invaluable when it comes to tweeking the final backscene. The two images below are a 'before' and 'after' view'.
Points to note are that the 1970s housing in the middle of the image, and in the left background have been 'removed' using the cloning tool. The new house bottom left has not been removed as it will be concealed by the rear of the baseboard. Note how the road descending into shot has been widened out and the wall on the left hand side extended so that they both now meet their counterparts on the actual layout.
Colourisation
Is there such a word? Getting to know what the different functions of a package do can be a long and frustrating business. I use PaintShop Pro, and I have had it long time but have only mastered a very small number of functions currently.
Having printed out the original sheets and put them up behind the layout, the final affect seemed very 'red', and attempts to reduce the red and increase the blue proved problematical. Such that I then left the files untouched for 18 months, before deciding I really did have to get the backscene done.
The image below shows the 'red' test boards, with a more recent 'blue' test piece printed out for comparison:
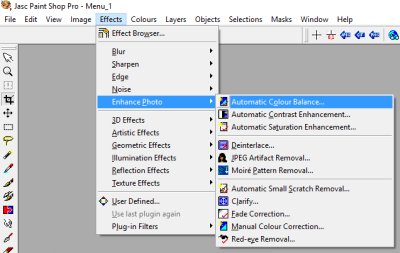
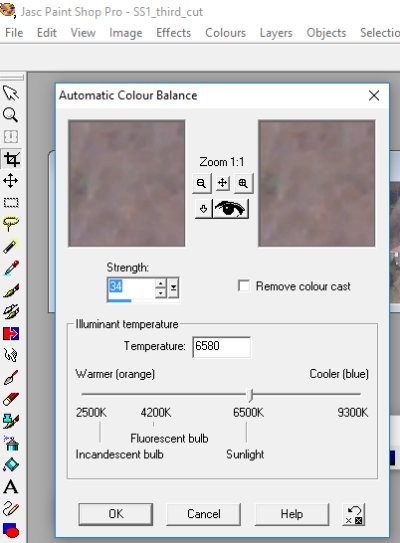
For those with similar software, the tool can be found in PaintShop Pro thus. On the toolbar, select 'Effects':
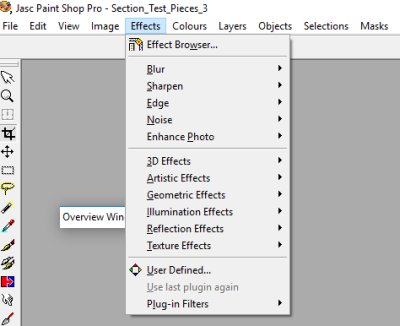
Scroll down to 'Enhanced Photo', and then 'Automatic Colour Balance'
Moving the Illuminant temperature slider left or right basically makes the image ether redder (left, artificial light) or bluer (right, cooler). In my original test run, the setting had been on Fluorecent bulb, and this gave the backscene a reddish hue. Further experimentation showed 'blue' was too blue, and perhaps not surprisingly, 6500k 'Sunlight' seemed pretty much spot on.
Clearly the backscene should compliment the layout and not dominate it. My very good chum artist Phil Moulycliffe suggested that the original appeared 'too magenta... If you make it more cyan based that will give the illusion of distance (refraction draws the warmth out of receding objects).'
Foreground from afar
The key with creating successful backscenes of specific sections of railway is finding a location which both matches the normal viewing position on the layout and does not have any obstacles blocking out key sections. With the main Hall Royd panoramas I was lucky, in that there were locations on the opposite hillsides given unobstructed views.
However there was a short section - about 3 feet - where the scenery adjoining the backscene dipped below the normal datum line. It was not possible to shoot below this 'line' as there was a long factory roof which obscured this part of the embankment. Access to the railway is not possible locally, and so 'shooting' this section of lineside was problematical.
On the same day as the original backscene panorama was shot, I also took a train ride between Todmorden and Hebden Bridge with the aim of shooting a video to help with forming the key features. The camera was placed on the table pointing out through the carriage window with the camera at right angles to the direction of travel. I also thought it might be possible to create an alternative backscene from frames taken from the video. Anyone who has tried doing this will know that objects in the background will appear multiple times on the final output, but I needed a section taken from the mid-ground.
You can view the video here, and the relevant section is from 00.01.09 to 0.01.16. The video was paused and a series of frames 'grabbed' thus:
These were joined together, ensuring a reasonable match in the mid-ground. The cloning tool was used to ensure an effective visual join, and this is the result:

Careful study of the horizon will reveal that the asbestos garage and the conservatory appear twice!
The final image is cropped, but note how the brick walling below the fencing on the right has been left in the image so that the this section can be matched with the main backscene.

Mounting: Pasting
In the test phase, A4 sheets were printed out from a Canon MP980 onto regular 90 gsm copier paper and these were affixed to mounting board sheets using Spraymount. For what was intended as a temporary fix, these have been surprising successful. The card mounting board sheets then fit into simple brackets formed from plywood at the rear of the baseboard. There has been no bubbling, and as the Spraymount is, err, sprayed onto the back of the sheet, and no issues of the ink running.
Some modellers report that the Spraymount looses its grip over time, and sheets start to peal off. It is worth noting that there are different types of Spraymount. The blue cans are for traditional artwork, where sections of type are laid and re-laid to achieve the final page layout. The red is a more permanent fix for photographs whereas the light brown is for permanent displays. I used the light brown.
For the second effort, which was intended to be permanent, matt photographic paper was used. The completed sheets were then spray varnished (brushing not advised). For varnishing I bought a matt varnish spray from the local 'arts and crafts' shop. These sheets took the ink well, but the material is stronger/thicker than the copier paper, with a plasticated back. Spraymount was again used, but this time the sheets were affixed to a plywood backing board. Sadly, these sheets suffered from bubbling.
The sheets were carefully removed, and re-affixed using Deluxe View Glue. Despite claims that any bubbles would disappear, they haven't! This may be due to the fact that the material is stiffer with a rigid/plasticated structure or possible more paste should have been applied. The results can be seen below.

The suspicion is that the photographic paper is too inflexible. A further test was undertaken to see if it would satisfactorily affix the PVC material used for the final backscenes to card. As the first image shows, it held the material firmly, and no obvious bubbles formed, and the card did not bend. However, gentle levering and it was possible to lift the PVC from the board. This suggests that the View Glue can be used to satisfactorily affix the PVC to the mounting board, but the 'light tack' fix means that the PVC can be easily removed. The final panel has been fixed using View Glue to see how it performs over time, as the fear is that it will ultimately peal off.
Mounting
Having completed the initial shaping and manipulation of the images, these were printed out on A4 sheets and then mounted on mounting board (available from good stationers).
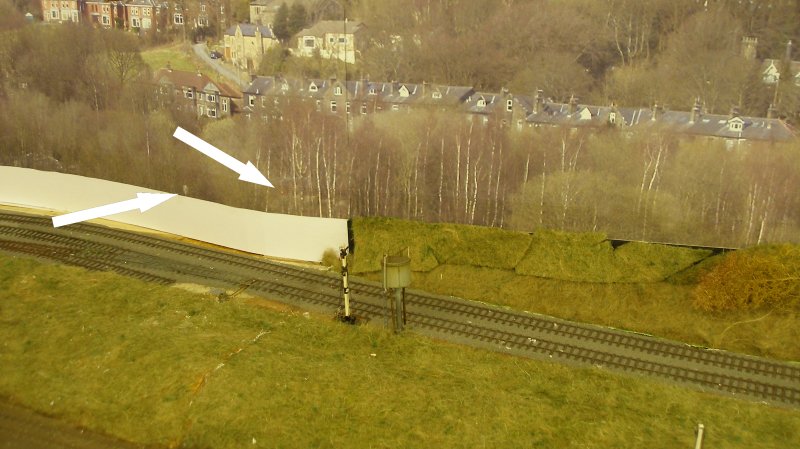
It can be seen this is a temporary lash-up, as the board has gently warped, and there is a gap in the middle distance where a 'step' was required in the image so that the scene matched the hard scenery at both ends. This was eventually eliminated by gently tilting the image so that in the final version it is continuous from end-to-end. This temporary backscene also allowed the original colouring to be assessed. The 'red' appeared to dominant, and in later versions was toned down. Also notice on the hillside above the 1920s housing is a much more modern affair, with cars jauntily parked around it. There are, in fact, three buildings of modern construction which were too apparent, even to the casual observer. These were photoshopped-out of the final image.
This initial use of A4 sheets printed out on a home printer also established the limitations of the technique. Although the sheets were varnished to protect them, and despite that the fact that they were all printed out at the same time on the same material, some faded quite markedly in the year they were displayed - and this was in a loft without external light.
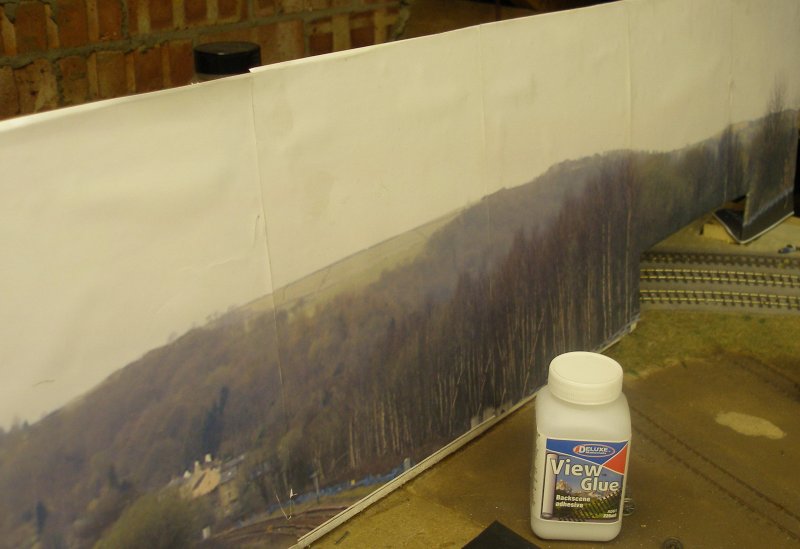
My local printshop was able to output the images on PVA, and a full set of were ordered. To provide a sturdy mounting system, 3-sheet ply was cut into 4 foot long x 18 inch sheets (to match each baseboard). These were primed to seal the surface. Finally white Velco was bought from the local ironmongers. This was approximately 2.5 inches wide, and was cut into three horizontal strips. Care has to be taken affixing the Velcro to the back of the backscene and the backscene must held firmly on a flat surface. I used the longest windowsill in the house, weighting down the PVC with a suitable selection of books. I can highly recommend E S Cox's 'Locomotive Panorama' and Rivington's 'My Life with Locomotives' both as excellent reads and as having the weight to hold the panorama in place.
The other side of the Velcro was then affixed along the top of each ply mounting board (the fluffy side was attached to the back of the PC backscene). In the image below, the furthest board and backscene are already erected. The two nearer boards show the Velcro in place along the top. Do NOT try and fix the 'stuck together' Velco, as supplied, to the mounting board, and then affix the backscene to the exposed self-adhesive strip. I tried this and it really doesn't work, as each strip needs to be gentle stretched onto a firm surface to avoid any ripples or waves in the materials developing.
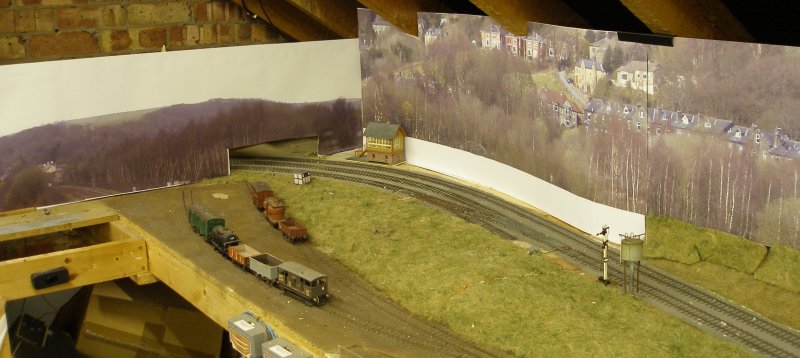
And then with the backscene attached...
And from the other direction. The tender first Jubilee is on a test run, having been recently outshopped on a new chassis. Note the flash of white above the third coach. This section is obscured by the roof of a block of flats when viewed across from the other side of the valley, and this is where the 'foreground' section will be mounted.
The PVC material hangs well, but there is a tendency for it to 'lift' or curl at the bottom of the sheet. Observation of banners and shop displays reveals that the top and bottom are firmly secured, often with a weighted bar or similar at the bottom. Replicating this arrangement either requires another Velcro strip along the bottom, or some way of wedging it if this is not possible. As the backscene hangs below the line of the scenery, it has been possible to insert wedges of mounting board that have created the necessary tension. On the sections where there is no convenient scenery, a piece of beading or firework rocket stick was placed on the baseboard, paralleling and just touching the bottom of the sheet is sufficient to check the curling effect.
Curves
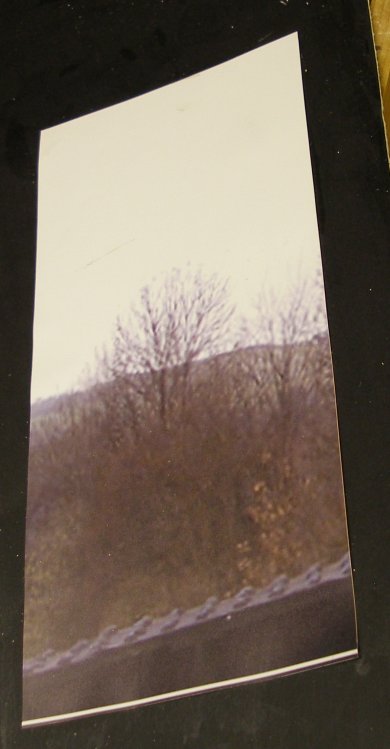
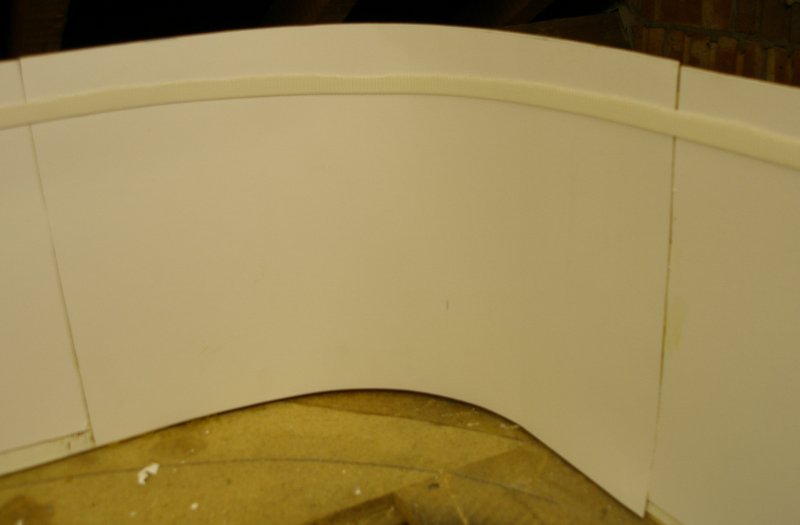
Corners really need curves, especially if the scene is continuous. I attempted to create a curved section in plywood. Whilst a curved section was achieved, there was an awkward gentle twist, which made it impossible to lay the backscene material flat on it. This image shows the work-around, which was to face the plywood (with the curved section straightened) with mounting board, which was curved by scoring the back, and then the curve fixed by formers.
Special Panels
The final panel is in a 'corner' of the layout, and is required to fill an awkward space where the return loops emerge from the backscene. As this has to be profiled to fit round the roof joists and also requires a reverse curve, it needed to be formed from something that could be easily cut and curved. This section was therefore formed from two sheets of mounting board to create a 'ply' construction, with the hope that such a construction will resist warping.
Because of the reverse curves involved, this has been affixed using Deluxe Materials' View Glue (see comments above). It held the backscene in place, and dried without any signs of bubbles. However just a few days the sheet had started to lift, so is clearly unsuitable for plasticated materials.
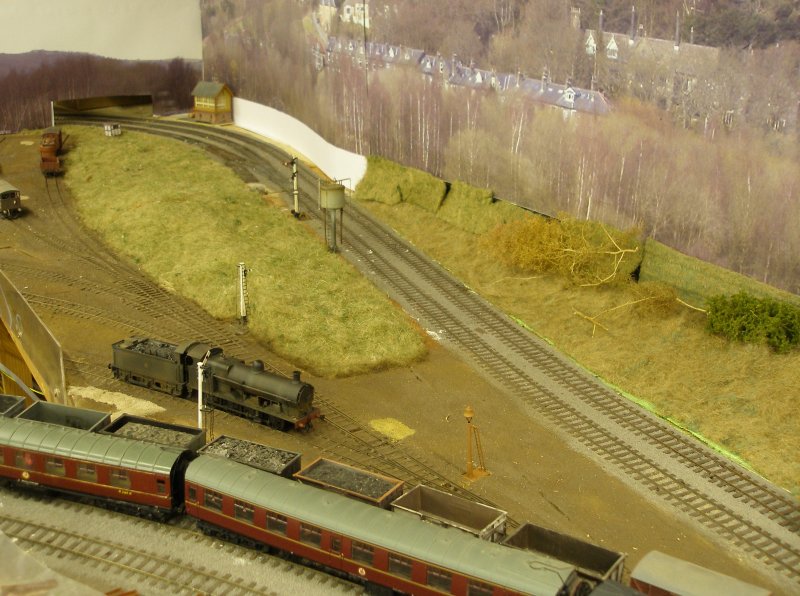
Note the black strip at the top of the backscene, above the signal. This is a piece of rigid plastic paper binding strip, and firmly connects the two sections of mounting board. Incidentally the signal box was made by Peter Leyland. It is actually a model of Kirkby, on the line out of Liverpool Exchange to Wigan, but fortunately it is an exact match for Stansfield Hall box.
Whilst the main viewable section of the layout matches the backscene exactly, the line to Copy Pit in reality curves sharply away from the main line to Manchester, and so when 'shot' from the other side of the vallley is foreshortened. Fortunately this section of the model is also less than prototypical length due to the rapidly approaching gable wall of the loft. However, this works rather well, as the backscene accurately reflects the locations of the key signature elements. In reality Stansfield Hall Junction is on the far side of the small coppice seen in the foreground of the backscene. But the new Todmorden West Chord curves sharply from 'Viaduct Junction' (was Todmorden East) to Stansfield Hall. The arrows show the location of the two modern signals on it: the upper arrow points to a red light glowing spookishly through the forestry, whilst the lower arrow indicates the back of the signal head protecting access to the main line. This way it is possible to gauge the location of the Junction on the backscene. The model Home signal and calling-on arm are therefore in approximately the right position in relation to the backscene.
The white areas will now have foreshortened embanking applied, with matching forestry, to link the model with the backscene. The location of the water tank (moved since the earlier photos) is correct, even though it appears to obscure the signal. However on the prototype this was a particularly sharp curve, and therefore the signal may have been easily visible to the right of the tank.
Warm weather warning
This all looked fine and dandy till a spell of hot weather in June 2017, when the heat in the loft caused the vinyls and the attached Velcro tape to expand and contract at different rates. This led to buckling, particularly on the curved sections. Also, the one section on which double-sided tape had been used to re-enforce the Rocket Deluxe Materials Backscene Adhesive also failed, with the adhesives unable to hold the weight of the vinyl.
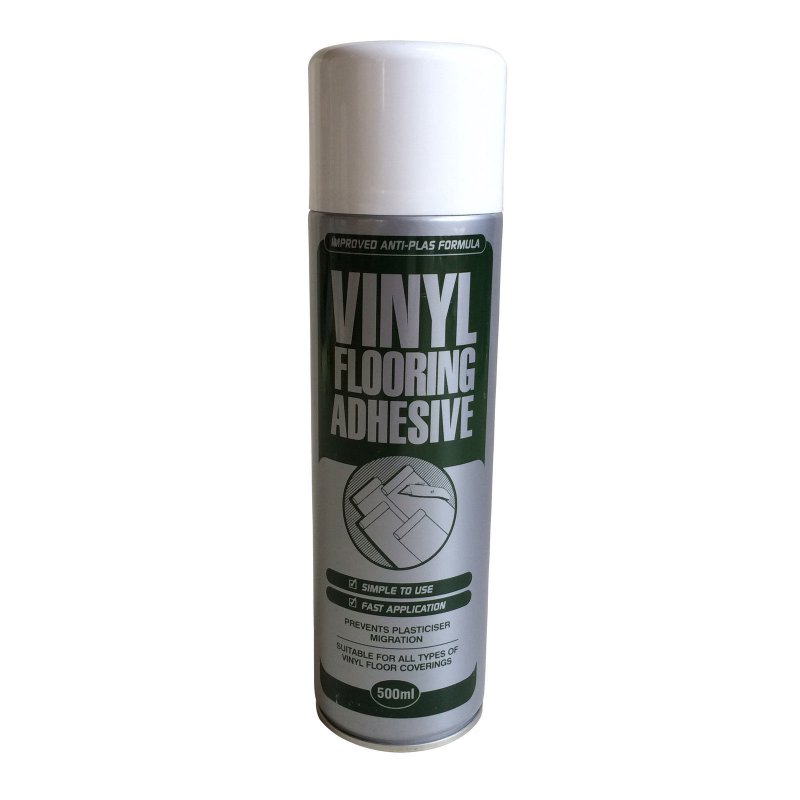
And here we get to definitions. Intense searching of the Web for PVC adhesive yielded no results. And then the following weekend a chance visit to a local hardware shop found a tin of spray Vinyl Floor adhesive. In the spray form it can be applied lightly for applications where materials need to be lifted and re-aligned, or with more spray applied, as a permanent fixing.
The Velcro tape was removed from the back of the vinyls and from the plywood boards: the vinyl is pretty tough and showed no tendency to tear. The spray was then applied to both surfaces, and the vinyls affixed to the plywood. This has proved highly successful, and now all the sheets have been re-affixed.
The tin, as shown below, was good for fixing approximately 24 feet of vinyl.
Cost
I used my local printshop who printed out four sheets on PVC. The finished size was 12 inches (304 cms) high throughout, although the length of the finished sheets varied, with the aim of ensuring the joints were in locations that didn't jar when viewing the layout as a whole. The total cost, including VAT, was £142, or £4.73 a foot.
This may seem high - particularly when compared to 'off the shelf' backscenes - but is comparable to buying a new RTR loco. I could have cut out the middle man and found a supplier on the Web and potentially got the price down to around the £80 including VAT for the four. And as I have used Velcro to secure the main runs, they can be reused.
I didn't keep a record of how much ink the printer used running out the A4 test sheets on copier paper, but I suspect had I used the manufacturer's original cartridges purchased from a national High Street stationers the cost might have been similar.

Copyright J K Wallace, t/a 'Hall Royd Junction' 2013-2023 email: Hall Royd Junction
7 Portobello Close, Chesham, Bucks. HP5 2PL, UK
tel: +44 (0)7513 412880